At first, that sounds ridiculous. The whole game revolves around those ten white targets at the end of the lane. But if you watch the bowlers who post 200+ games week after week, you’ll notice something interesting: their eyes are rarely locked on the pins. Instead, they’re focused on something much closer—those small, dark marks about a quarter of the way down the lane: the arrows.
Lane arrows are the unsung landmarks of modern bowling. They never move, never change, and never lie. When you understand how to use them, they become a reliable roadmap that connects your release to the pocket. And unlike the pins, which are 60 feet away, arrows sit at a distance your eyes and body can manage with much more precision.
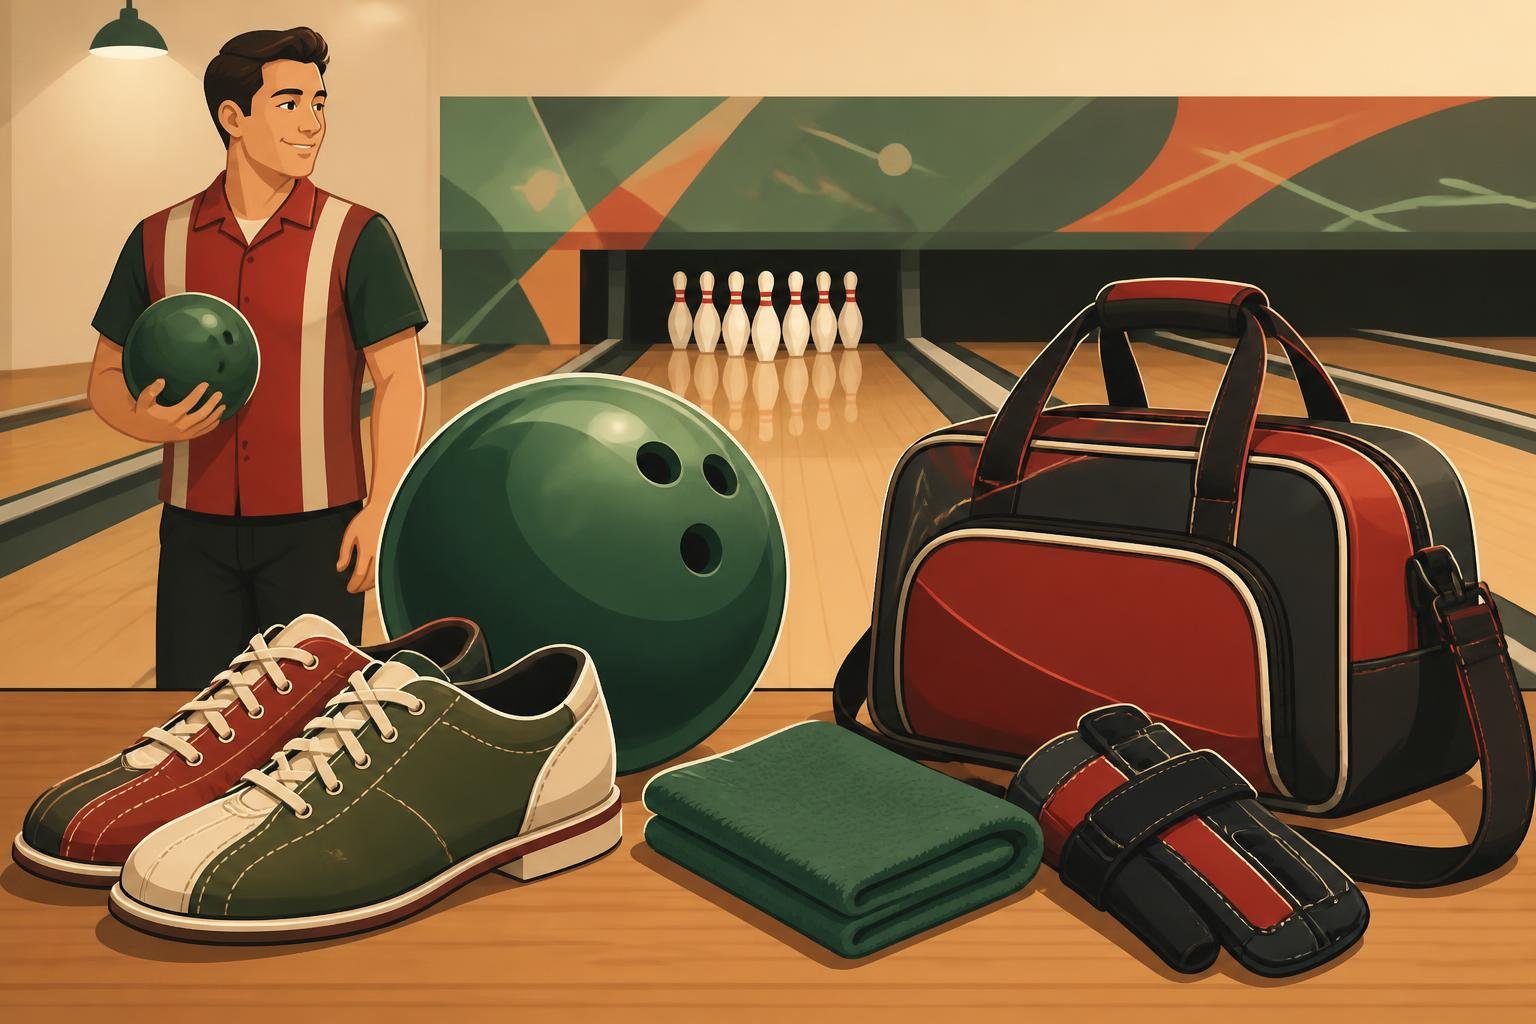
This guide is for bowlers who want control instead of guesswork. Maybe you’re new and tired of “throw it down the middle and hope.” Maybe you’re a league bowler stuck around 150–170 and you want to stabilize your average. Or maybe you’re already playing some hook and different lines but feel like your shots are more “feel” than system.
What follows is a complete, practical framework for using lane arrows: how they relate to boards, oil patterns, different styles of play, spare shooting, and lane transition. The goal isn’t to turn you into a robot. It’s to give you a clear, repeatable way to aim that still leaves room for your own style and feel.
How the Lane Is Marked (And Why It Matters for Aiming)
Before arrows can help you, it’s worth slowing down and really understanding what you’re looking at when you step onto the approach. Bowling lanes are not just strips of wood or synthetic material—they’re carefully measured playing fields, regulated by bodies like the United States Bowling Congress (USBC).
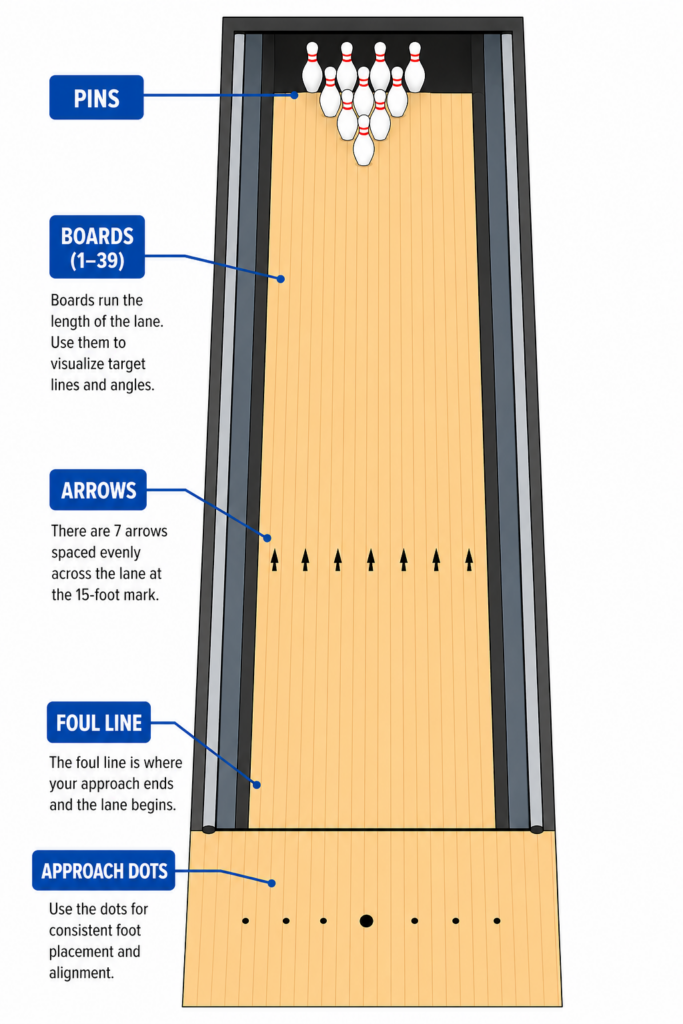
Key Reference Points from Approach to Pins
From your starting position to the pins, here are the landmarks that matter most:
Approach and dots: On the approach, you’ll see two main rows of dots, usually around 12 feet and 15 feet from the foul line. These dots line up with specific boards on the lane and help you place your feet the same way every shot. They’re your “address markers” for where you stand.
Foul line: This is the boundary between the approach and the lane. Crossing it with any part of your body during the shot is a foul, no matter how perfect the strike looked. More importantly, it’s where the lane technically begins and where the ball will first make contact just beyond it.
Boards: The lane is divided into 39 narrow boards running lengthwise, from the right gutter to the left. The very right board is board 1 for right-handers; the very left is board 39. The center line (the middle of the lane) is board 20. When bowlers say “I’m playing 8 board” or “I moved my feet to 25,” they’re talking about these boards.
Arrows (the “target zone”): Roughly 15–16 feet past the foul line, you’ll see a cluster of arrows. Most houses have seven visible arrows, spaced five boards apart. The center arrow is on board 20, and the others fan out symmetrically on both sides. This zone is where most bowlers should focus their vision for both strike and spare shots.
Range finders and downlane markers: Many modern synthetic lanes have small dark markers farther down—often around 34–40 feet—sometimes called “range finders” or “breakpoint markers.” On sport or challenge patterns, some advanced bowlers use these instead of arrows as a primary visual target.
Breakpoint (concept, not a marking): The breakpoint is where your ball makes its sharpest change of direction and turns toward the pocket. On typical house conditions, that might be somewhere around 35–45 feet, depending on your speed, rev rate, and ball choice. You can’t see it marked, but you can estimate it based on boards and arrows.
Pins and pocket: At 60 feet from the foul line, the pins sit in their familiar triangular layout. For right-handers, the “pocket” is between the 1 and 3 pins. For left-handers, it’s between the 1 and 2. That’s where you want the ball to arrive, but not where you want your eyes to aim.
Why Arrows Sit at About 15 Feet (And Not Closer or Farther)
The placement of arrows isn’t random. They’re roughly one-quarter of the way down the lane for a practical reason: it balances what your body can control with what your eyes can reliably track.
If the targets were, say, five feet away, the smallest inconsistency in your swing or release would be magnified by the time the ball traveled the full 60 feet. If they were closer to the pins, your eyes would struggle to stay focused during your approach, and your brain would tend to drift back to the pins anyway.
Fifteen feet is a sweet spot. It’s far enough that any change of a board or two at the arrows actually means something downlane, but close enough that most bowlers can visually lock onto them and stay there throughout the approach.
How Oil Patterns Interact with the Arrows
Everything that happens to your bowling ball between your hand and the pins is filtered through one invisible factor: lane oil. You don’t see it, but you feel its effects every shot.
On a typical house shot (what most recreational and league bowlers see), there’s a lot of oil in the middle and much less toward the outside boards. This creates a built-in “bumper” effect: miss inside, and the extra oil keeps your ball from hooking too much; miss outside, and the dry boards help it hook back.
On sport or challenge patterns, the ratio of oil from inside to outside is much flatter, and the pattern length is often longer. There’s far less free hook outside and far less hold inside. A one-board miss at the arrows can be the difference between a strike and a split.
Arrows give you a fixed reference point to read how your ball is reacting to that oil. When you can say, “I hit board 9 at the arrows, and the ball started hooking at 38 feet instead of 42,” you’re no longer guessing. You’re observing cause and effect in a measurable way.
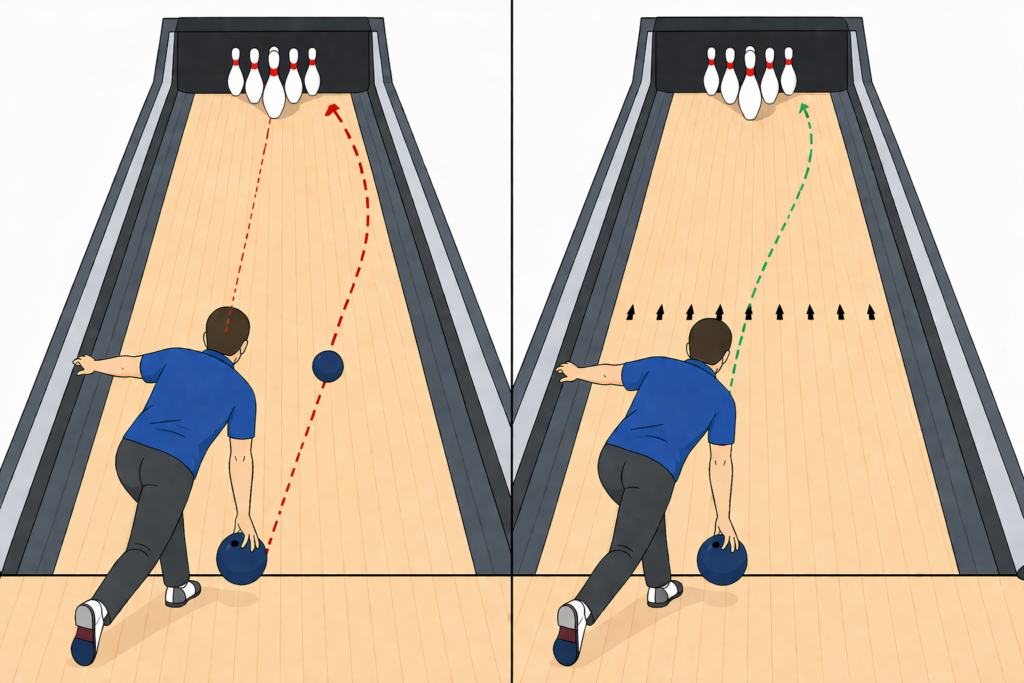
Why Arrows Beat Pins as an Aiming Target
Here’s the core problem with aiming at the pins: distance magnifies tiny errors. If you’re off by one degree at release, that small angle can translate to several inches—or more—by the time the ball travels 60 feet. And you can’t easily see those small errors because your focus is so far away.
Aiming at arrows effectively shortens that distance. Instead of trying to throw the ball at a target 60 feet away, you’re trying to roll it over a board 15 feet away. Your eye-hand coordination is simply better at that range.
Once you can consistently hit the same board at the arrows, adjusting to get the right entry angle into the pocket becomes much simpler. You stop wondering, “Was that my fault?” and start asking better questions: “Did the lane change? Do I need more angle? Should I move my feet?”
What to Look At: Dots, Arrows, or Pins?
There are three sets of visual guides on every lane: dots on the approach, arrows in the lane, and the pins at the back. Each serves a specific role, and confusing those roles is where a lot of bowlers run into trouble.
Approach Dots: Your Foot and Body Landmarks
The dots on the approach exist to help you start in the same place every time. They’re not meant to be your final aiming points for the ball.
Most bowlers develop a “home” starting position—something like “slide foot on the center dot” or “right foot on board 25 using the back row of dots.” That relationship between your feet and a specific target arrow becomes the backbone of your targeting system.
When you want to change your line, you usually move your feet first (relative to a dot or a specific board) and then slightly adjust your visual target at the arrows. That’s how you maintain the angles you want instead of randomly shifting your aim.
Lane Arrows: Your Primary Visual Target
For most bowlers, the arrows are the main aiming reference. When coaches talk about “targeting” or “playing a line,” they’re usually talking about what board your ball crosses in the arrow zone.
This can be a specific arrow (like the second arrow, which sits around board 10) or a board between arrows (like board 8 or 12). As you improve, that precision matters: “second arrow” and “board 9 at the arrows” are not the same thing.
The habit to build is simple in theory, harder in practice: pick a board or arrow, lock your eyes on it during the entire approach, and release the ball so that it rolls directly over that spot. Score is secondary while you’re developing this discipline. Hitting your target consistently is the real foundation.
Pins: The Result, Not the Target
The pins tell you if you got the result you wanted. They should not drive where your eyes go during the shot.
Here’s the basic chain: laydown point → arrows → midlane reaction → breakpoint → pins. The pins are the final checkpoint. If you hit your arrow but leave a weak 10, that’s not a targeting problem; it’s a ball motion or lane-read problem. If you miss both your arrow and the pocket, that’s more about execution.
It feels counterintuitive at first, but the more you treat pins as outcome and arrows as target, the more stable your game becomes. You stop steering the ball with your eyes and start trusting your line.
Looking “Through” the Arrows (Without Losing Focus)
A phrase you’ll hear from experienced bowlers is that they look “through” the arrows. What they really mean is that, while their eyes are fixed at the arrow zone, their brain is projecting the full path: where the ball will skid, where it will hook, and where it will enter the pocket.
You don’t have to force this. Start with a clear focus on a single board at the arrows. As that becomes comfortable, you’ll naturally begin to think beyond that point—where you expect the ball to start picking up friction and how it should drive through the pins.
When Advanced Bowlers Target Farther Downlane
Some high-level and professional bowlers will shift their visual target away from the arrows and closer to the breakpoint, especially on sport patterns. They might aim at a specific downlane marker 35–40 feet away to control exactly where the ball changes direction.
This approach demands rock-solid physical consistency and a very steady head. If you’re still working on hitting a board at 15 feet most of the time, stick with the arrows. As your physical game and lane awareness improve, experimenting with downlane targets can become the next step.
Building a Solid Arrow-Targeting Process
Arrow targeting works best when it’s part of a routine, not a vague idea. The goal is to create a simple process you can repeat whether you’re bowling in practice, league, or a tournament with more pressure.
Choosing a Starting Target Arrow for Your Style
Where you aim at the arrows depends largely on how you naturally throw the ball.
If you bowl mostly straight: You might find comfort targeting near the center of the lane—around the second or third arrow—keeping your line simple and direct. For some spares, you might use the same arrow but change your starting position for cross-lane angles.
If you hook the ball: On a typical house shot, a common starting point for a right-hander is to stand with your slide foot around board 20–25 and target near the second arrow (board 10) with a projected breakpoint around board 5–8 downlane. Left-handers would mirror this to the opposite side.
None of these numbers are universal rules. Think of them as starting suggestions. The real clue is how easily your ball gets to the pocket with your normal release and speed. If you’re forcing the ball or constantly changing grip pressure just to hit your mark, the line might not be right for you.
Aligning Body, Feet, and Ball to the Arrow
Once you pick a target arrow, your body alignment should support that line instead of fighting it.
Feet: Place your slide foot on a specific board on the approach. Your non-slide foot will usually be next to or slightly behind it, depending on your style. The key is that you know exactly which board your slide foot is on.
Hips and shoulders: If you’re playing straight up the lane, your hips and shoulders can be relatively square to the foul line. As you move deeper inside and increase your angle, your torso may open slightly, matching the direction your swing will travel.
Ball position at setup: Many bowlers find consistency by holding the ball somewhere between under their chin and under their bowling-side shoulder. The idea is that your swing can travel in a straight plane toward your target arrow without needing to weave around your body.
Where Your Eyes Should Be (And Stay)
One of the most underrated skills in bowling is disciplined eye focus. A lot of shots that “mysteriously” miss are really just cases of eyes drifting late in the approach.
A simple visual routine can anchor you:
First, step onto the approach and place your feet. Before you move, shift your eyes to your target arrow or board in the arrow zone. Let your gaze settle there for a moment. As you start your pushaway, keep looking at that same target. During the backswing, while you’re sliding, at the moment of release—your eyes should stay planted on that board.
If you tend to peek up at the pins, you’ll feel it when you start paying attention to this. It’s surprising how often bowlers “check” on the pins mid-approach and pull their shoulder or swing with them. Breaking that habit alone can tighten your shot pattern.
Keeping the Swing on Line with the Arrow
Targeting only works if the ball actually travels on the line you’re imagining.
Think about where your swing is relative to your head. Most coaches want the ball to swing somewhere under your head—or at least directly under the shoulder—so that the swing plane matches the intended line toward the arrows. If your swing drifts behind your back or way out to the side, you’ll have to “steer” to hit your target, and steering usually leads to inconsistency.
Two simple cues help here:
Let gravity swing the ball: A relaxed swing is easier to keep on plane. The harder you manipulate it, the more chance it has to wander.
Follow through toward your target: After you release, your hand should continue on a path that points toward your arrow. If your follow-through flies off to the side, it often signals that you pulled or pushed the ball off line.
Turning Arrows into a Pre-Shot Routine
A repeatable pre-shot routine takes pressure off your mind and lets you focus on execution. Here’s how arrows can sit at the center of that routine without turning it into something overly rigid:
You step onto the approach and check your feet against the dots or specific boards you use. You quickly recall which arrow you’re planning to hit and why (based on the last shot’s reaction). You draw a brief mental line from your laydown point through your arrow and out to your expected breakpoint. You take a breath, soften your shoulders, lock your eyes onto your target board, and then you go.
The exact motions are up to you, but the role of the arrows is constant: they’re the fixed visual anchor that you return to every single shot.
How Different Bowling Styles Use Lane Arrows
Not all bowlers use the same arrows or the same parts of the lane, even on identical conditions. Your axis rotation, speed, rev rate, and comfort zone all influence where arrows make the most sense for you.
Straight Bowlers: Simplicity and Precision
If your ball travels mostly straight with very little hook, arrows help you become precise rather than “hit or miss.”
For strikes, you might aim a relatively straight line through the second arrow into the pocket. You’ll adjust by a board or two with your feet and target when you start hitting high or light.
For spares, arrows become even more important. You’ll likely play cross-lane angles that cut through specific arrows so your ball travels straight into the spare cluster. In this style, the goal isn’t to manufacture hook; it’s to let a consistent straight shot and accurate targeting do the work.
Strokers: Classic Second-Arrow Play
Strokers tend to have a smoother, more controlled release with moderate revs. On house conditions, the archetypal stroker line is something like “right of center, second arrow target, gentle arc to the pocket.”
Because the house pattern usually provides some free hook outside and hold inside, strokers can use the second arrow as a reliable base and then make small moves—one or two boards with feet and target—when the ball reaction changes.
In this style, arrows are less about playing extreme angles and more about tuning a comfortable, repeatable shot.
Tweeners: Moving Deeper as the Lanes Transition
Tweeners live between strokers and crankers in rev rate and speed, often able to play both straighter and deeper lines depending on the condition.
Early in a session, you might use the same second-arrow line as a stroker. As games progress and the outside part of the lane dries up, you’ll begin moving your feet left (for right-handers) and shifting your eyes to more inside arrows—third, sometimes fourth. The arrows become markers for how far inside you’ve moved.
Many tweeners use simple mental rules, such as moving both feet and target together—“two left with my feet, one left with my eyes”—to keep a consistent angle as they chase oil across the lane.
Crankers: Managing Big Hook with Inside Arrows
Crankers generate higher revs and stronger hook shapes. Their challenge is usually not “how do I make the ball hook” but “how do I control how and when it hooks.”
They might stand near the center or even the far inside of the lane and target the third, fourth, or fifth arrows, projecting the ball out toward a breakpoint near the gutter. When you’re creating that much angle, being off by a board or two at the arrows can mean either missing the friction window or over-jumping it.
For crankers, arrows are essential checkpoints that keep big hook under control. Without that structure, it’s very easy to get trapped in chase-and-guess mode when the lane starts to transition.
Matching Arrow Choice to Your Natural Game
This is where a lot of bowlers get stuck: they copy the lines they see on TV or from the highest rev player in the league, even when their own style is nothing like that.
If your speed is high and revs are low, you’ll often need to find friction earlier and may be more comfortable with arrows closer to the outside. If your rev rate is high and speed is moderate or low, you’ll often be more comfortable using inside arrows and staying in the oil longer.
The best way to find your “home” arrows is to experiment deliberately on a fresh house condition. Keep your natural release and speed. Test different target arrows with small foot moves until you find a combination that lets the ball get to the pocket without heroic effort. That combination becomes your starting point—the thing you return to when you feel lost.
Using Arrows to Shape and Control Your Hook
Hook isn’t just about what your hand does at release. It’s about where you send the ball compared to the oil pattern. Arrows are where you choose that path.
The Four Stages of Every Shot
Thinking of each shot in four stages can clarify how arrows fit into the bigger picture:
Laydown point: The board where the ball first touches the lane after it leaves your hand. This is usually just beyond the foul line.
Arrow zone: Where the ball crosses your chosen board at or near the arrows. If it doesn’t cross where you intended, you know you missed your target, regardless of what the pins say.
Breakpoint: The spot downlane (often between 35 and 45 feet) where the ball leaves its skid phase and makes its strongest hook move.
Pocket entry: The point and angle where the ball hits the 1–3 or 1–2 pocket.
Arrows sit early in this chain, but they’re the easiest to see and measure. If you’re hitting your arrow and the ball still isn’t getting to the pocket correctly, the issue is somewhere later in the chain—usually oil breakdown, ball choice, or speed/rotation.
How Moving Your Arrow Changes Angle
Shifting your target arrow—even by a single board—changes your ball path. The effect multiplies the farther down the lane the ball travels.
Moving your arrow outward (closer to the gutter): Generally straightens your line or gives the ball access to more friction earlier, depending on how far out you project it.
Moving your arrow inward (toward the middle): Generally sets you up for deeper inside lines with more angle into the pocket, provided the lane has enough friction downlane and your ball has enough energy left.
On house shots, it’s common to see bowlers move their feet and arrows together in small increments, effectively sliding their entire line left or right while preserving its basic shape.
When the Ball Hooks Too Much
If your ball is jumping early and going high through the headpin or crossing over to the opposite side (Brooklyn for right-handers), something in the front or midlane is too dry for your current line.
A common correction is to “move in and find oil.” For a right-hander, that often means moving your feet a couple of boards left, then moving your target arrow a board or so left as well. You’re keeping the angle but placing the ball on deeper boards where there’s more oil.
The trick is not to overdo it. One or two boards at a time is often enough. Big, panicky jumps make it hard to know what actually changed.
When the Ball Hooks Too Little
If your ball skids past the breakpoint and hits weak, leaving flat corners or washouts, it’s likely not seeing enough friction—either because there’s more oil downlane than you expected or because your speed/rotation combination doesn’t let it pick up soon enough.
On a typical house pattern, right-handers often respond by moving both feet and target slightly left (deeper inside), then projecting the ball out toward friction at the breakpoint. Left-handers do the mirror image. It sounds counterintuitive—move into the oil to get more hook—but the added angle often gives the ball more room to “stand up” and drive through the pocket.
Factoring in Axis Rotation and Speed
Arrows don’t exist in isolation from your physical game. Two bowlers can hit the same board at the arrows and get completely different shapes if their speed and rotation are different.
More side rotation: Leads to more backend angle. On high-friction backends, this can make very small arrow moves produce big changes in pocket entry.
More forward roll: Produces smoother, more controlled motion. You may depend more heavily on subtle arrow/foot adjustments rather than relying on backend snap.
Speed changes: Slowing the ball a bit usually makes it hook sooner; speeding it up delays the hook. When you’re experimenting, try not to change speed and arrows at the same time unless you’re intentionally testing a new combination—otherwise you won’t know what caused the reaction change.
Mentally Rehearsing the Ball Path
One practical habit that separates more advanced players is mental rehearsal. Before you step on the approach, you can quickly picture the entire path: the ball leaving your hand, crossing a specific board at the arrows, gliding through the oil, turning at your chosen breakpoint, and slicing through the pins at the desired angle.
This doesn’t have to be elaborate. A two-second mental picture is often enough. Over time, your brain will build a “map” of how different lines look and feel. When something is off, you’ll sense it faster, and arrow adjustments will feel more intuitive rather than theoretical.
Structured Arrow Targeting Systems That Actually Work
Many bowlers treat arrows as rough suggestions—“about the second arrow somewhere.” A more structured approach can remove a lot of uncertainty, especially under pressure.
Three-Point Targeting: Laydown, Arrows, Breakpoint
Three-point targeting is a common coaching method because it organizes the shot into manageable segments.
You start by choosing a laydown point on the lane based on where you stand. Then you choose a specific board at the arrows. Finally, you estimate your intended breakpoint downlane—a certain board at a certain distance.
Visually, you connect those three points into one continuous path. Your eyes focus primarily on the arrows, but your mind is aware of the beginning and end of the line. The USBC Coaching resources offer more detail on variations of this method if you want to go deeper.
Five-Board and “Feet/Eyes” Adjustment Rules
Many bowlers use simple adjustment rules to keep things consistent. One common guideline on typical house shots is something like: move your feet five boards and your eyes three boards in the same direction to preserve your entry angle when lanes transition.
For example, if your ball starts to go high while you’re hitting board 10 at the arrows, you might move your feet left five boards and your target to board 13. You’re still playing a similar shape, just shifted into more oil.
The exact numbers aren’t sacred. Some bowlers prefer “two and one” moves or three-board parallel moves. The important part is the concept: your feet and your target move together, not randomly.
Thinking in Boards, Not Just Arrows
Arrows are useful landmarks, but they span five boards each. If you want real precision, it helps to think in actual board numbers within and between the arrows.
Instead of simply “the second arrow,” you might decide you’re targeting board 9 or board 11 at the arrows. That level of detail gives you more control over adjustments: moving from board 9 to board 10 is a measured change, not a vague guess.
Building a Personal Lane Map
Over time, it’s useful to track which combinations of feet and arrows work best on specific lanes or in your home center. Some bowlers keep a small notebook; others jot notes in their phone.
You might record things like: “On fresh, right lane, stand 23, target board 10 at arrows, breakpoint near 7, good carry. After two games, move to 27 and 13.” Over weeks and months, you’ll start to recognize patterns: how certain pairs play, how quickly they transition, which balls and arrows tend to match up best.
This isn’t about memorizing magic numbers; it’s about speeding up your learning curve so each new night of bowling doesn’t feel like starting from zero.
Using Arrows to Adjust for Lane Transition and Oil Patterns
Even with perfect mechanics, your ball reaction will change as games go by. Oil gets moved, absorbed, and burned up. What worked in frame one might not work in frame fifteen. Arrows help you see and respond to those changes before your scores suffer.
Recognizing When the Lane Is Changing
It’s easy to blame yourself for every bad shot, but lane transition is real and inevitable. Here are classic signs that the lane, not your physical game, is driving the reaction:
Earlier hook: The ball starts reading the lane earlier and dives high despite hitting your target arrow. The heads (front part of the lane) are likely drying out.
Later hook or skid: The ball glides past your usual breakpoint and hits light, leaving weak corners or bucket-like leaves. Oil may be carrying down or gathering in the midlane.
Inconsistent reads: The ball reacts differently from shot to shot even when you hit your target. You may be dealing with “cliffed” conditions—very dry outside and heavy oil inside—or a pattern that has broken down unevenly.
If you’re confident you hit your arrow yet see dramatically different results than earlier, that’s your cue to adjust rather than fight the lane with more muscle.
Using Arrows to Measure Your Adjustments
The beauty of arrows is that they let you make small, controlled moves. Instead of “move somewhere left,” you can decide “two boards left with my feet, one left with my eyes.” Then you watch how that change affects where the ball crosses the arrows and where it turns downlane.
If you keep track of where your ball actually crosses the arrows (not just where you intended to aim), you’ll get an honest picture of your accuracy and how well your adjustments are working.
Simple Moves for Drier vs. Oilier Conditions
On drier lanes or later in the session, the usual strategy is to move into more oil. For right-handers, that often means moving feet and arrows left; for left-handers, the mirror image. You’re looking to soften the ball’s reaction by giving it less friction upfront.
On very slick or fresh conditions, you often do the opposite: move toward friction. That might mean standing a bit more right (for right-handers) and targeting closer to the outside arrows, or weakening your axis rotation while still targeting in a way that lets the ball touch dry boards at the right time.
Arrows let you track these moves with intention instead of just “trying something different.”
House vs. Sport: Arrow Precision and Expectations
On a house pattern, there’s built-in forgiveness. Aiming near the second arrow often gives you a little room to miss left or right and still hit the pocket. That’s by design; centers want recreational bowlers to see strikes.
On a sport pattern, the oil is much more even. Missing your arrow by a single board can be the difference between a strike and a nasty split. Here, disciplined arrow targeting becomes non-negotiable. Many competitive bowlers will also move their visual focus slightly farther downlane to better control the breakpoint.
If you’re curious how different patterns are shaped, the Kegel pattern library is a good place to study layouts and see how length and volume affect where your ball should leave the pattern and how arrows come into play.
Knowing When Arrow Moves Aren’t Enough
Sometimes adjusting at the arrows and with your feet just isn’t enough. You can find yourself backed up against the ball return or running out of lane while still not getting a usable reaction. That’s usually a sign you need a different tool, not a different target board.
As a general guide:
Adjust arrows and feet first for moderate changes—ball going a little high or a little light, carry getting weaker, shape getting slightly earlier or later.
Change balls when you’ve moved several boards and still see the same problem: ball hooking too early no matter how deep you go, or refusing to hook even when you’re playing extreme angles.
Adjust release when you’re confident enough in your physical game to intentionally add or remove axis rotation or tilt—not as a desperate reaction every time you see a different reaction.
In all cases, arrows remain home base. Whether you’re using urethane or a high-end reactive, weak hand or strong, you’re still working around a specific target zone on the lane.
Using Lane Arrows to Build a Reliable Spare Game
If you want your average to go up and stay up, your spare game matters at least as much as your strike ball. Arrows are crucial here, because spares are about accuracy and repeatability more than power.
Why Spares Deserve Their Own Targeting System
Missing a single makeable spare in each game can cost you 20–30 pins over a three-game league night. Over a season, the effect on your average is significant.
Most bowlers know this intellectually, but you can see who takes it seriously by how they talk about spares. Bowlers with solid spare games can usually tell you exactly where they stand and what arrow they use for a 10-pin, a 7-pin, a 3–6–10, or a bucket. It’s not guesswork; it’s a system.
Plastic vs. Reactive for Spare Targeting
A plastic (polyester) spare ball hooks very little and makes it easier to play straight angles using the arrows as true guides. You throw it over a chosen board and, barring extreme lane conditions, it mostly goes straight.
If you’re using a reactive ball for spares, you can still use arrows, but you’ll want to reduce axis rotation and maybe increase speed to keep the ball from moving too much. You’ll also often target more toward the oil in the middle of the lane to tame the reaction.
If you bowl regularly and want to tighten your spare game, a plastic ball is worth considering. Most pro shops—many listed through the International Bowling Pro Shop and Instructors Association (IBPSIA)—can help you choose one and fit it correctly.
Corner Pin Systems and Arrow Targets
For right-handers, the 10-pin is often the most frustrating spare. For left-handers, it’s the 7-pin. The fix is rarely “try harder.” It’s usually “aim more precisely and do it the same way every time.”
Most right-handers shooting the 10-pin with a plastic ball will stand far left and aim at a board somewhere between the middle and right side arrows, sending the ball almost straight across the lane. Left-handers do the reverse for the 7-pin.
The specifics vary by person, but a typical description might sound like: “For the 10-pin, I put my slide foot on board 35 and roll the ball over board 15 at the arrows with a straight release.” Once you discover your own numbers, write them down. Then practice them until they feel automatic.
Multi-Pin Spares and Arrow Adjustments
For clusters like the 3–6–10 or 2–4–7, arrows help you fine-tune the angle needed to hit the lead pin and still cover the back ones.
Many bowlers will adjust slightly off their strike line—moving feet a few boards, keeping a similar target arrow, and straightening out the release to let the ball drive more directly through the spare cluster.
The logic is the same as with strikes: use arrows as fixed reference points, move in small increments, and keep notes for the spares that show up most often in your game.
Spare Routine Anchored by Arrows
Your spare routine can be simpler than your strike routine, but it should still have structure.
You see the leave and mentally call up the alignment you’ve practiced for that spare. You place your feet on the exact board you use for that shot. You pick your arrow—often the same one you always use for that spare, regardless of which lane you’re on. You quiet your hand, use a straighter release, and roll the ball over that board.
After a while, spares stop feeling like new puzzles each time. They start to feel like familiar tasks you know how to handle, because the relationship between your eyes, feet, and arrows is consistent.
Common Arrow-Aiming Mistakes (And Simple Fixes)
Even bowlers who “know” about arrows sometimes use them in a way that quietly undermines their game. The good news is that most of these issues are straightforward to fix once you notice them.
Drifting Back to the Pins Mid-Approach
You might think you’re aiming at the arrows, but if your eyes jump to the pins right before release, your body tend to follow. That small glance often pulls the swing or shoulders off line.
The fix is boring but effective: commit to keeping your eyes on your target board until the ball passes over it. If you find yourself peeking ahead, slow down between shots and consciously reinforce the habit.
Changing the Target Without Moving Your Feet
Another common issue is changing your arrow by several boards while your starting position stays the same. That changes your launch angle dramatically and usually in an unplanned way.
If your ball is consistently going high, for example, and you just move your arrow farther right without moving your feet, you may create a more direct line that makes the ball hit even higher.
The cleaner approach is to move feet and target in a planned relationship. If the line shape was good but location was wrong, shift the entire “triangle” of laydown, arrows, and breakpoint together.
Overreacting After One Bad Shot
Everyone throws a bad shot. If you yank one inside or accidentally loft one, that doesn’t mean your line is broken.
Save bigger arrow or foot moves for patterns that consistently repeat—multiple shots where you’re sure you hit your target yet see the same undesirable result. One pulled shot doesn’t require a three-board adjustment; it requires a reminder to execute the fundamentals.
Head Movement and Unsteady Focus
Even if your eyes are pointed at the arrows, a bobbing or drifting head can move your swing path. Many bowlers don’t realize how much their head shifts until they see it on video.
A stable head over your slide foot, with a soft but steady gaze on the target, makes it much easier for your arm swing to stay on line. If you’ve never recorded your approach from behind, it’s worth doing at least once to see what’s really happening.
Ignoring Lane Change and Blaming Execution
Finally, there’s the stubborn version of error: you know the lane feels different, but you keep using the same arrow, same ball, same everything, and chalk bad shots up to “throwing it bad.”
Execution matters, but so does environment. If you hit your target and see a very different reaction than earlier in the session, that’s a sign the lane has changed. At that point, resisting adjustment is really just resisting reality.
Practice Ideas to Sharpen Your Arrow Targeting
Targeting is a skill like timing, balance, or release. It improves fastest when you give it specific, focused practice instead of only working on it while chasing scores.
Single-Arrow Accuracy Game
Pick one board in the arrow zone—maybe board 10 on the right side—and commit to rolling the ball over it repeatedly for several frames. Don’t worry how the pins fall; you’re training your visual focus and swing alignment.
Keep an honest count: out of ten shots, how many actually passed over or very close to that board? Over time, try to increase that percentage. Your scores later will benefit, but the “win” during this drill is hitting the target, not striking.
Fixed Feet, Moving Target
Stand in one spot on the approach and, without moving your feet, change your target arrow from outside to inside across multiple shots. Observe how different launch angles feel and how the ball travels when only your eyes move.
This drill helps you connect visual shifts with physical outcomes. It also makes you more comfortable with subtle arrow moves when you need to adjust in competition.
Spare-Only Sessions
Occasionally dedicate a whole practice session—or at least a game—to spare shooting with arrow focus. Work specifically on your usual trouble leaves: corner pins, buckets, and common three- or four-pin clusters.
Focus on consistent foot placement, the same chosen target arrow for each spare type, and a repeatable straight or controlled release. Keep score if you want, but track how often you actually hit your intended target at the arrows. That’s the part that translates most directly into better conversion percentages.
Use Video to Check Swing-to-Arrow Alignment
Having a friend film you from behind (in line with your shot) can be eye-opening. When you play it back, look for whether the ball actually travels straight along the path from your stance to your target arrow, or if it swings behind or around you.
You may also notice head movement, drifting feet, or last-second arm adjustments that you never felt. Once you see them, you can use arrows as external checkpoints to correct those tendencies.
Setting Measurable Goals
Instead of treating practice as “throw until I’m tired,” give yourself concrete targeting goals. For example: “Out of 30 shots, I want at least 20 to hit my intended arrow within one board.” Or: “I want to convert 8 out of 10 10-pin attempts using my spare line and arrow target.”
Those kinds of goals are specific, trackable, and directly tied to skills that will raise your scoring ceiling.
Equipment, Fit, and How They Affect Arrow Use
How well you can use arrows doesn’t depend only on your eyes and brain. The ball you use, how it’s drilled, and how well it fits your hand all influence how predictable your ball motion is once it passes over your target.
Coverstock Types and Arrow Sensitivity
Plastic (polyester): This is the straightest, least reactive option. For spare shooting and very dry conditions, arrows become almost literal aim points—the ball more or less travels where you send it.
Urethane: Urethane reads the lane earlier and hooks more slowly and smoothly. It can be very useful on shorter or flatter patterns where you want a controlled reaction that doesn’t jump off the dry. Arrows give you a clear way to manage how direct or how wide you play that smooth shape.
Reactive resin: Reactive balls respond more strongly to friction and can generate more backend motion and pin carry. With this kind of equipment, small changes at the arrows can cause much larger differences at the pins, especially on fresh house shots with built-in friction zones.
Knowing how each ball in your arsenal responds when it crosses a specific arrow on a given pattern helps you choose whether to adjust your line or change to a different ball altogether.
Speed, Rev Rate, and Where You Aim
Your natural speed and rev rate combination influences which arrows make sense.
If you tend to throw the ball faster with low to moderate revs, you may find more success playing closer to the friction—using arrows nearer the outside and more direct lines. If you’re rev dominant with moderate speed, you’ll probably end up targeting more inside arrows and letting the ball spend more time in the oil before making its move.
Again, there’s no single “right” arrow for everyone. The goal is to find arrows that allow your natural release to work with the lane, not against it.
Fit, Grip, and Consistent Releases
If your ball doesn’t fit your hand well, hitting arrows consistently becomes much harder. Squeezing the ball tends to make you pull it inside your target. A grip that feels too loose can make you subconsciously slow the swing or alter your path to avoid dropping it.
A clean, relaxed release is key to letting your swing travel in a straight plane toward your target. Working with a qualified pro shop to get a proper fit can dramatically improve how often you hit your intended board, even without changing anything else about your mechanics.
Using Coaching and Pro Shop Input for Targeting
A coach or knowledgeable pro shop operator can help you connect the dots between ball motion, equipment, and arrows. They might watch you throw a few shots, note where the ball crosses the arrows and where it exits the pattern, and then suggest different ball or line choices.
Publications and organizations like Bowlers Journal often highlight coaching perspectives and ball reviews that tie directly into targeting and lane play. That outside perspective can accelerate the process of figuring out which arrows work best with your current arsenal and style.
Turning Arrow Targeting into Consistent Scores
When you put it all together, lane arrows become more than markings on the lane. They connect your stance, swing, ball choice, and lane reading into a single, coherent system.
On a typical shot, the process might look like this: You remember how your last ball reacted and decide whether to stay or shift. You step onto the approach, place your feet on specific boards using the dots. You choose an exact board at the arrows and briefly picture the ball traveling from laydown to that board, then out to your breakpoint and into the pocket.
Your eyes settle on that board. You start your approach, letting the ball swing freely beneath your shoulder. At release, you feel your hand travel through the ball toward your target. Then you watch how the ball actually behaves relative to your mental picture and use that information to refine your line on the next shot.
Over time, this routine creates a quiet kind of confidence. You know what you were trying to do, and you can describe it in concrete terms—where you stood, what board you targeted, where the ball started to hook, where it entered the pocket. When something goes wrong, you have specific variables to adjust instead of vague frustration.
Practically, that usually shows up as more pocket hits, better carry from improved entry angles, fewer wide misses, and more routine spare conversions. In other words: the scores on the monitor start to line up with the effort you’ve been putting in.
Making Lane Arrows a Permanent Part of Your Game
Arrows are easy to ignore. They’re small, they’re subtle, and they don’t shout for attention the way a rack of pins does. But once you start using them consistently, it’s hard to imagine bowling without them.
You don’t have to overhaul everything at once. Pick one or two changes and build from there. Maybe your next practice session is simply about committing to one specific target board for your strike shot and tracking how often you actually hit it. Or you might decide to finally nail down a dependable 10-pin line—feet here, arrow there—and stick with it for a few games.
As your comfort with arrows grows, your adjustments will feel less like guesses and more like informed decisions. And when you step on the approach in a new center or on a different pattern, you’ll have a familiar framework: find a starting line, relate it to arrows, observe ball motion, and adjust in measured steps.
In the end, the pins are still the goal. But the game gets a lot more predictable—and a lot more satisfying—when you let arrows guide how you get there.